Thursday, June 28, 2012

Wedding shower cake

This is the wedding shower cake I made last night. I intentionally chose a simple design because I knew I would not have much time to decorate. I get home from work at 5 and the party was at 8.

But for some reason, everything with this cake went wrong.

Thing 1 - I baked all the cakes Tuesday night so they would be ready to be decorated. I stuck the last one in the oven kind of late, so my hubby (who was staying up anyway) said he would take it out when the timer went off. Well, in my half-asleep state of mind, I read 'baking-soda' as 'baking-powder.' When I got up the next morning The cake was terrible. It had not fluffed up at all. I had to throw it out and make another one before I went to work.

Thing 2 - I also made my icing before I went to work. I use a recipe that calls for cooking and then letting it set in the fridge to firm up and I wanted to give it plenty of time. Again, something went wrong and when I got home it was the consistency of pudding. It tasted great!! But it would not work. Hubby to the rescue!! Or at least, hubby to the store...... to buy frosting. =(

Thing 3 - At this point I am feeling like we can do this! The cake is dirty iced and covered in fondant. All I have to do know is decorate it and frost the cupcakes. So hubby (isn't he great?) said he would do the cupcakes, and I start piping away. He used a pipe bag too to make swirls on the cupcakes. Not three cupcakes in and his bag busts at the seam. (He is a bit of a hulk anyway so I didn't think much about it). Then mine does too. Ugh....

Oh well.... With a little improvising this is what we ended up with.


It definitely is not my best work, but considering the time crunch and all the little snags, I am pretty happy with it.


I love the black and white.... so classy and romantic!!=)

To see how to make a heart shape cake without a heart shaped pan click here.

Tuesday, June 26, 2012

Trying my Hardest

I really like working out with other people. I know I push myself harder with others around, especially if they are able to do more than me. The company makes the time go by faster and for me, it helps take my mind off of the fact that my muscles fell like jello and I may in fact drop this dumbbell right on my face (skull crushers kill my arms!!).

But not all workout partners provide this kind of company. I have recently learned that there are certain people I should not work out with.

Not everyone is encouraging. Not everyone is motivating. And some people just don't understand that even if they think they are helping you by telling you everything that you are doing 'wrong' that they are really just giving you one more reason to walk out  the gym doors and not come back in. As if I needed any more reasons......

There are 1000 ways to skin a cat and there are a million different ways to work out. Sure, some are better than others, but they are all better than sitting on the couch eating potato chips.

The bottom line is, I have gone from a size 18 to a size 8. I got my first gym membership at 15 years old (with my mom's signature), and I have gone from 250+lbs to 169lbs. I know how to workout. And I know what works for my body.

I don't want to be able to bench press a truck, I don't care how much I can lift. I just want to get a good sweat, feel my muscles working, and feel sore in the morning. That is what works for me.

I just think everyone who steps into a gym should respect the fact that every body is different and everyone is at different points on their fitness journey. And believe it or not, not everyone has the same goals that you do. I work DIFFERENTLY to achieve DIFFERENT goals. Not better, not worse, just DIFFERENT.

Just because I am not trying YOUR hardest does not mean I am not trying MY hardest.

Please excuse the curse word, but this says it all!!

Please don't tell me I can lift more. Please don't tell me to do my push-ups faster. Please do not call me a wimp. Please don't look disappointed when I finish my reps. Please don't scoff when I ask for a lighter weight. Please don't make me feel like I am not pushing myself.

I understand this kind of 'encouragement' may work for some people (especially guys), but when I tell you repeatedly that it does not help me, respect that.

Be encouraging. Be positive. Be supportive.

So if anyone reading this works out with a partner, take time to ask them what motivates them. Tell them what motivates you. And then, just do that. A great workout partner is like gold!! But what makes a workout partner 'great' will be different for different people. Make sure you know how to be one.


What do you need from a workout partner??

Tuesday, June 19, 2012

Make Mascara Last Longer

I hate buying mascara.

I spend ten bucks on something so tiny!! And does anyone ever really notice if I am wearing it or not?

Then two months later it starts drying out and I feel the need to go buy more. What really bothers me is that there is still so much in the bottle that I haven't used! But it is dry and clumpy so all I can do is throw it out. Well it is time for that nonsense to stop.

There are several tricks to making your mascara last longer. The easiest by far is to add a few drops of contact solution to it and stir it up. This alone can add a month or more! It keeps it from getting dry and clumpy so you can actually use the entire bottle. When was the last time that happened?


Another trick is to never 'pump' the wand into the tube. This increases the amount of air that gets in and drys it out. Instead, twist the wand to get more mascara on it. This helps keep it moist longer.

Now if you are like me, with very sensitive eyes, the dryness of the mascara is not the only thing that bothers you. As the wand gets older it gets more dust and germs on it. After a couple months or so, even if it is not dried out, it makes my eyes itch so bad that I would have to throw it out if not for this tip. Boil the wand! I know, it sounds weird. But seriously, boil a bit of water and stick the wand in and clean off all of the old mascara on it. This removes enough germs and dirt for me to use it for another month at least.

Mascara is expensive, especially when you think about what you are getting (goop on your face.) But if you take care of it you could wind up only needing to buy it twice a year. You may think it is not worth the effort, but if someone was willing to pay you ten dollars to boil a small pot of water, would you? I would. So just think of it as paying yourself! =)

If you spend $10 on mascara every two months you would spend $60 a year. Or, by making it last longer you could spend only $20 or $30 a year. I don't know what your family's budget looks like, but that helps mine.


Taco Seasoning

One more way to save money and know what you are feeding your family. Make your own taco seasoning! No preservatives or modified anything. You control what goes in it.
It is so easy to make and saves you money!


Here is the recipe I use.

2 Tbsp all-purpose flour
2 Tbsp chili powder
1/2 t garlic powder
1/2 t onion powder
1/2 t red pepper flakes
 1/2 t oregano
1 t paprika
1 Tbsp cumin
2 t pepper


You may want to add salt. We are not big on salt in our house and we like it just fine without any.

I add about two Tbsp per pound of meat with a little bit of water, a few splashes of Tabasco and a can of southern ranch style beans. SOOO yummy!!

If you like a dryer taco meat without a bit of a 'sauce', just omit the flour and water.

You could also substitute the flour for ground rice. Just run a Tbsp through a coffee grinder until it is a powder. You would only need to use 1 Tbsp of rice instead of 2 Tbsp of flour.  

You can also use this mix for chili. The only difference is the chili to cumin ratio. So I just use this mix and add more chili to taste.

Store in tupperware or an old spice bottle.

=)

Monday, June 18, 2012

Glass Stove top Cleaner

We moved into a house a few months ago that had a glass stove top. I thought it looked so nice! But I quickly discovered that I do not like glass stove tops. They burn water!! I still have not quite figured out how they do it. But any time I boil something and it boils over, the water burns onto the stove and is so hard to get off. Not to mention anything else that drops on a burner. And even when nothing is spilled, after using a burner just a few times there is always a black ring around it. Needless to say I will never buy a glass stove top.
They have special cleaner that works okay, I guess. I was still scrubbing my hardest even with the cleaner. And it cost $5 for a tiny bottle!! I am just not okay with that. My husband tried a very entertaining method. He turned all the burners on high, poured water on the entire stove, and used a metal spatula to scrap the burn stuff off while it was still hot. Not a bad approach but not something I want to do every other day or so.


So I thought, "What would Grandma do?"

Of course! Baking Soda!!


So to test it I waited until it got pretty ugly (doesn't take long when you are teaching a 13 year old boy to cook) and tried it out. I poured a bunch on the stove, got a scratchy sponge and scrubbed. It took seconds!! My husband was so impressed at the minimal effort I was putting into scrubbing that he took the sponge to try it out himself. To which I had no objections. When a man volunteers to clean, don't question it.

Anyway here are the before and afters....


Why waste the money? Baking soda is pennies per ounce. And it is so useful for so many things. The same night I cleaned the stove, I noticed our white sink was not so white any more. I hate the smell of bleach so I tried baking soda. I looks new! I also use baking soda to clean our toilets, to treat grease stains in our laundry, and to deodorize tennis shoes. The list of uses is endless! You can save so much on different cleaners. And even though we don't have young children in our house just yet, I love that we don't have to keep so many chemicals around.


What do you use baking soda for?


Wednesday, June 13, 2012

Cleaning Schedule

Okay, so is it possible to keep a home clean in just fifteen minutes a day? I don't think I ever really consider my house 'clean.' There are three levels of dirty in my house; presentable, acceptable, and terrifying. Cleaning around all these boys is about as effective as brushing your teeth while eating Oreos. And this isn't the best plan of attack if you haven't cleaned in four dust bunny generations. But yes it is possible to get a list of weekly chores done in 15 - 20 min a day (depending on the size of your house and how fast you clean). That and a few minutes here and there throughout the day to maintain your clean home and you're done! Don't knock it til you try it! So here is my schedule. I should add the 30 minutes A DAY that I spend closing the kitchen cabinets. Every time I walk in the kitchen one or more are wide open. But I am assuming you don't have that issue. And I may be exaggerating a bit.

This is what works for our family.


Feel free to let me know what you think!! =)

Monday, June 11, 2012

Dalek Cake

One of my best friends got married this weekend. I was honored to be in the bridal party. It was a beautiful ceremony and she looked amazing!
For years she had said that she was going to use dalek cake toppers. I was so impressed that she really did!!

This is not a cake that I have made but I just had to share the pictures. I am sure many of you will not understand the reference, but for those of you who do, it is just too funny to pass up.


You will have to excuse the quality of the pictures. Although the bridesmaid's dress did have pockets, I still did not want to carry around a big bulky camera in them. So these were taken with my phone.


For those of you who do understand the reference I also have to tell you about the best man's speech. It was funny and heartfelt the whole time, but as we raised our glasses to the happy couple he ended his speech with this, "And remember, turn left and don't blink."

Oh My Word, I died a little. =)

Monday, June 4, 2012

Mean Green

You may not think it based on all of the cakes I love to make so much, but I actually try very hard to be live a healthy lifestyle. And let's just be honest, no sugar canNOT be healthy. I just won't believe it.

So I do only enjoy it in small amounts and infrequently.

I recently watched a documentary called Fat, Sick, and Nearly Dead. In it, a man does nothing but drink juiced fruits and vegetables for 60 days. It was his last hope to get rid of his extra weight and a disease that had him on numerous prescriptions.

I was so shocked by his results that I tried my own juice fast.

You see, I was significantly overweight for most of my childhood. I never weighed myself but I know that in the eighth grade I wore a woman's size 18. That's too big for a Jr. High School student. But since high school I have done very well to maintain balance in my diet and engage in an active lifestyle. On my wedding day I wore a size eight dress.

But I do still have a few pounds here and there that have been EXTREMELY stubborn!! At one point in time I did a Daniel Fast for 30 days (fruits, veggies, and nuts ONLY) while running a mile at least three times a week and did not loose a pound. So I knew in order to shed these last few I would have to do something dramatic.

After watching this documentary, I decided to give it a try. I got me a juicer and a cart full of fruits and veggies. I stayed on it for 10 days and lost 10 pounds. (Praise the LORD!!)

Many people told me that this was unhealthy, but I have NEVER felt so good on a diet in my life. I had so much more energy and even saw improvement in many other areas that I didn't even think would be effected. I was never hungry. In fact I had to start making smaller juices because I had trouble finishing them!!

I went off of the fast and jumped back to my old eating habits. Not that I have terrible eating habits, but I do love meat and dairy products. And a weak spot for breads too. But I didn't gain anything back! In fact I have eaten normally for about a month now and no gain!!

I AM SOLD!!

Now I have a wedding to be in at the end of the week, so I thought I would start it up again for the next five days.


Here is my favorite.....


I call it Mean Green Juice.....

It is

2 Stalks of celery
1/2 a cucumber
2 bunches of Kale
1 or 2 apples (depending on size)
And sometimes a few green grapes or half a pear.


It is a lot better than it looks. The flavor of the fruit overpowers the veggies.


And seeing a lower number on the scale EVERY DAY makes it super easy to stick with.

Let me know what you think if you try it!!=)

*UPDATE*


Well I have juiced for the last four days. I have not been very strict about it. There were a couple birthday parties this week and a bridal shower and I live by the 'when in Rome' rule of dieting. When I am at these celebrations, I allow myself to indulge in small quantities of the yummies. So almost every day I had something a little extra: pizza, cake and punch, but in small quantities. I also have not been doing my regular exercises.

I still have lost four pounds. =)

If you are looking for a healthy way to loose weight, there is nothing that I would recommend more strongly. I have tried every weight lose scam under the sun. Nothing beats adding fruits and veggies (in large quantities) and cutting back on everything else. And since it is not realistic to think that I would gnaw on celery all day (love celery juice, hate celery), what better way to eat them than to drown out their flavor with some apples and grapes!!=)

I hope you give it a try and let me know how it works for you!!


Rubber Ducky Cake

Here are the pictures of the rubber ducky cake. I was so pleased with how it turned out. Everything is edible except the duck. The bottom is a very rich devil's food cake with chocolate ganache filling and frosting (yum!). I was super nervous about how it would taste since I have never made ganache before. It turned out great but I think I learned a few tricks to make it better next time.


I think one of the kids started poking and picking at the "1" and the pink circle. But it held up alright.


The tub was a white cake. I colored half of the batter blue and then swirled it together to look like a bubble bath the whole way through. I thought it looked really cute!


The original plan was to use blue fondant for the water and bubbles too, but once I dirty iced the cake with the blue frosting I realized it looked so much more like water. The bubbles turned out better with frosting too.


I learned a lot while making this. For instance, the cake I used as a base was not sturdy enough to have such a heavy cake on top of it. You can't see it much in the picture but it made the cake very lopsided. But it still turned out great and my next one will just be even better for it!

I also made a blue punch with pineapple sherbert and floated some duckies in it too. I didn't get any pictures of that though, there were always people in line for it!! It tasted so good! 


Hope you like it! If you have any tips or comments I would love to hear them!


Barbie Cake

My cousin's little girl just had her first birthday!! The theme was rubber duckies, so of course I made a rubber ducky cake (pictures to come). But there is a tradition in my family. One that has stood the test of time for three generations!! My Grandma has made a Barbie Doll cake for every daughter, granddaughter, and great-granddaughter's first birthday (there aren't many boys in our family, not sure what we will do when we have those). Well for the past few weeks my Grandpa has been in and out of the hospital, so she asked me to make the Barbie cake!! Umm.... YES! I love tradition. And I love that I get to pick up this one and continue it for the next three generations.


So here it is!!


I used a Pampered Chef glass measuring bowl to bake the cake. The dress still wasn't quite tall enough (although it was the perfect shape) so I baked an 8" round for the bottom. Perfect =)


I didn't spent too much time decorating this one, because the best part of the tradition is that the guest of honor gets this cake all to herself in her highchair. I didn't get any pictures of her after she had really dug into it and made a mess (I was cutting the other cake) but I will try to get some from others and post them too.


I think it is safe to say she liked it. I think big sister may have been a bit jealous too. =)

Friday, June 1, 2012

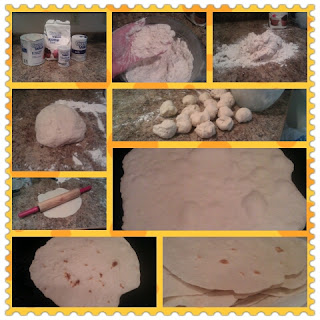
Tortillas!

I can't imagine why anyone with a working kitchen, basic ingredients, and a a few extra minutes wouldn't want to make their own tortillas. Unless they have a phobia of great tasting food. Is that a real thing? Is there a word for it? Deliciophobic?? Yep let's go with that.

Then a friend of mine pointed out that it is probably because they just don't know how. A little more reasonable I suppose. But for those of you suffering from deliciaphobia, don't wait to get help!! You can conquer this!!

 For the rest of you, you are only minutes away from acquiring a skill that will make you powerful beyond belief! You will be the most popular person you know! People will actually want to be you!
Well..... you will be able to make tortillas. That's close to the same thing.


So here we go......

Step one:

Ingredients. No this is not an advertisement for Great Value. I'm just cheap. Or as I like to call it economically intelligent.


You will need:

  • 4 cups of flour
  • 1 tsp salt
  • 2 tsp baking powder
  • 2 T shortening or firm butter 
  • 1 1/4 cup VERY hot water


Step two:  

Mix the flour, salt, and baking powder in a large bowl. Cut the shortening or butter into the flour mixture (I just use my hands but you could easily use a fork or pastry cutter). Be sure to distribute the shortening or butter throughout the entire mixture. If there are large clumps you will have greasy spots and dry spots in your tortillas. It should look like small beads covered in flour throughout the mixture. It is hard to see in a picture but you will understand as you do it.


Step three: 

Next, mix in the water. It should be as hot as you can handle on bare skin. My water is steaming from out of my faucet so I usually don't heat it up. But if yours isn't, stick it in the microwave for a minute or so. You want it to be hot so that it will melt the butter. If the butter is melted before you add it to the flour it is very hard to distribute through the whole batch. That's why I use the water to melt it. (I use my hands to mix in the water too.... it's not as much fun if you don't get a little messy!).
Then dump the whole thing on a clean counter top or table. It is okay if it looks like this. This is normal. 


Step four:

Now is the fun part! Knead the dough until most of the flour is incorporated. This is where trial and error will teach you to make the perfect tortilla, since I can't take a picture that tells you how the dough should feel. It should be very smooth, not too sticky, but not dry. I usually don't use all of the flour. What I don't knead into the dough I use when I roll them out. It will look something like this. Notice that there is still flour on the counter, that isn't extra, that is from the original four cups.


Step five: 

This recipe makes 16 tortillas. So I divide it up as evenly as possible. I pull the dough apart in halves. Then again with the halves and again and again. They will seem very small but they roll out to a good size. 


Step six:

Roll them out!! If you have a tortilla press this part is ridiculously fast and easy. But I don't. And I think it is safe to say if you are reading this you don't either. So I use a rolling pin. The most important thing is to not use much flour at all. This isn't a pie crust. It will dry out and the loose flour on your griddle will burn and smell awful and make your tortillas look awful and it will all probably make you cry. So just don't do it. *sigh*


If you want perfectly round tortillas, take a plate or lid of a pot, put it in the middle and cut around it with a pizza cutter. I use to do this but now I just don't care that much. They taste good enough that it doesn't matter what they look like.


Step seven: I usually have my griddle heating up from the time I start. I put it on medium and adjust as I go if needed. The MOST IMPORTANT part of making tortillas is the towel...... Have a towel ready for the tortillas when they come off of the griddle. Keep them covered ALWAYS. By trapping the warmth and moisture, you will keep your tortillas soft and flexible. This is the most common mistake made and it is the easiest to fix. I usually use the thickest towel I have and line it with paper towels.


Put your first tortilla on the griddle. And start rolling out the next one.


When you have a few good size bubbles on your tortilla, flip it over.


You will only need to keep it on this side for about 10 to 15 seconds. Then place it in the towel and cover it. Keep going until they are all done.

Don't they look so yummy?!?


Well good luck with your tortilla making adventures! If you have any questions feel free to comment. I will get back with you as soon as I can.

Thanks for stoppin' by!! =)